A beautifully designed charcuterie board may feel more like a grown-up treat, but with the right ingredients, delicious grazing boards can provide fun and nutrition for the whole family.
No matter what you call it, charcuterie boards, grazing boards and snack platters are all basically the same thing. The boards make a trendy addition to an entertaining menu, but a platter or kid-friendly board can be equally pleasing.
What you serve on a grazing board is entirely up to you. Most include a selection of meats and cheeses, and many incorporate nuts, crackers, dips and jams. Some also incorporate fresh fruits and vegetables. Creating your own board means there really are no rules; you can add just about anything you want.
To build a successful board, keep these tips in mind:
Choose ingredients and elements that don’t require temperature control. The idea of a grazing board is that it sits out for a while. Avoid anything that needs refrigeration, heat or will lose its shape or flavor if it rests for an extended amount of time.
Select a surface large enough to hold a variety of food. It can be a simple cutting board or a cute platter. There’s no specific size requirement but err on the side of bigger; spacing out your goodies can be more attractive and less messy.
Use high-quality ingredients to ensure every bite is delicious and nutritious. While shopping, remember to look for the Produce for Kids and Healthy Family Project logos next to favorite items in the produce department, as adding these flavorful fruits and veggies to your cart can help make a difference in your community.
Build your board around a theme to add an extra element of fun. Use mini cookie cutters to make fun, kid-friendly shapes out of cheese and meats. Be mindful of colors; a rainbow platter is vibrant and appealing, and colorful fruits and veggies offer a strong mix of nutrients.
Remember it doesn’t have to be elaborate. Classic favorites are all you need. Even kid favorites like sections of mandarin oranges, carrot sticks and chocolate chips are fair game for a family-friendly board.
In a world of packed schedules and boring food, it can feel like doing the healthy thing means giving up some of what makes you happy – like treats and flavors you love. Choosing health shouldn’t mean restricting yourself; everyone deserves a treat now and again.
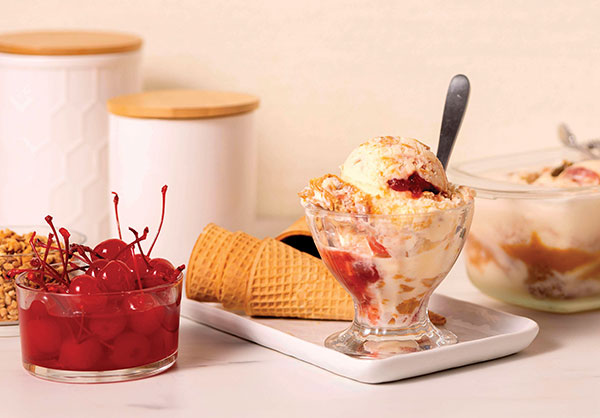
Try incorporating better-for-you ingredients into your favorite indulgences. Look for convenient, ready-to-use products, like Premier Protein High Protein Shakes, to help infuse the nutrition you need with the joy you deserve. With 30 grams of protein, 160 calories and 1 gram of sugar, the shakes make it easy to take the first step and keep that momentum going, adding nutrient-dense protein to nearly any recipe.
In addition to a smooth, creamy texture, each shake delivers 24 vitamins and minerals including vitamins C and E, which help support a healthy immune system as part of a healthy diet and lifestyle. With 11 flavors – including strawberries & cream and chocolate – there’s an impossibly indulgent option for everyone to make a healthy life a happy endeavor through recipes like Peanut Butter Jelly Ice Cream and Chocolate Ice Cream with “Caramel” Sauce.
In large, heavy saucepan, heat milk, protein shake, brown sugar and salt until bubbles form around sides of pan. Whisk small amount of hot mixture into egg. Return to pan, whisking constantly.
Cook and stir over low heat until mixture thickens and coats back of spoon. Remove from heat; whisk in peanut butter. Quickly transfer to bowl; place in ice water and stir 2 minutes. Stir in cream and vanilla. Press wax paper onto surface of custard. Refrigerate several hours or overnight.
Fill cylinder of ice cream freezer 2/3 full; freeze according to manufacturer's directions.
When ice cream is frozen, spoon into freezer container, layering with jelly; freeze 2-4 hours before serving.
Nutritional information per serving: 271 calories; 23 g total fat; 11 g saturated fat; 0 g trans fat; 72 mg cholesterol; 205 mg sodium; 13 g total carbohydrates; 1 g dietary fiber; 8 g total sugars; 6 g protein.
Wash and scrub sweet potato. Pierce with fork several times. Place on microwave-safe plate and microwave 5 minutes; flip and microwave 5 minutes. Allow to cool.
In microwave-safe bowl, microwave chocolate chips in 20-second increments, stirring between each increment until smooth and melted. Set aside.
Remove sweet potato skin and thoroughly mash. Pack into 3/4 cup measuring cup. Place in large blender.
Add melted chocolate to blender along with vanilla, sea salt, coconut sugar and chocolate protein shake.
Place lid on blender and blend on high at least 1 minute, or until ingredients are smooth and incorporated.
Transfer to ice cream maker and prepare according to manufacturer's directions then transfer to airtight container and freeze 2-3 hours.
To make "caramel" sauce: In microwave-safe bowl, microwave coconut oil and syrup 30 seconds. Stir and microwave 30 seconds, or until melted and smooth. Stir in almond butter and whisk until smooth. Add sea salt and vanilla extract; whisk to combine.
Set "caramel" sauce aside at room temperature about 30 minutes. Top ice cream with sauce and additional chocolate chips, if desired.
Nutritional information per serving: 346 calories; 18 g total fat; 11 g saturated fat; 5 mg cholesterol; 219 mg sodium; 40 g total carbohydrates; 4 g dietary fiber; 31 g total sugars; 7 g protein.
Between work, after-school activities and homework, planning memorable family time is nearly impossible. Changing that mindset can start by making mealtime simpler with recipes that serve up big smiles for the whole family and fuel fun, even on weeknights.
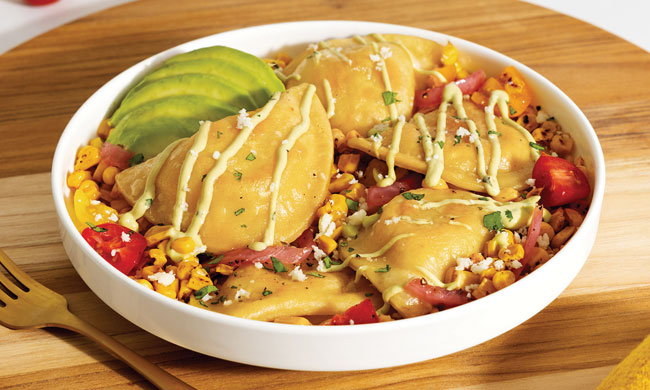
As a quick and easy mealtime solution that gives families time back to make lasting memories, Mrs. T’s Pierogies are pasta pockets filled with the stuff you love like creamy mashed potatoes, cheesy goodness and other big, bold flavors. Now, parents can get all their loved ones involved with the Go-Fun-Me Challenge – a commitment to make a simple dinner one night a week and create a memorable family experience in or out of the home with the time saved. By opting in between May 2-June 3, parents are entered to win $12,000 and a year supply of pierogies to help fund and fuel all of that fun.
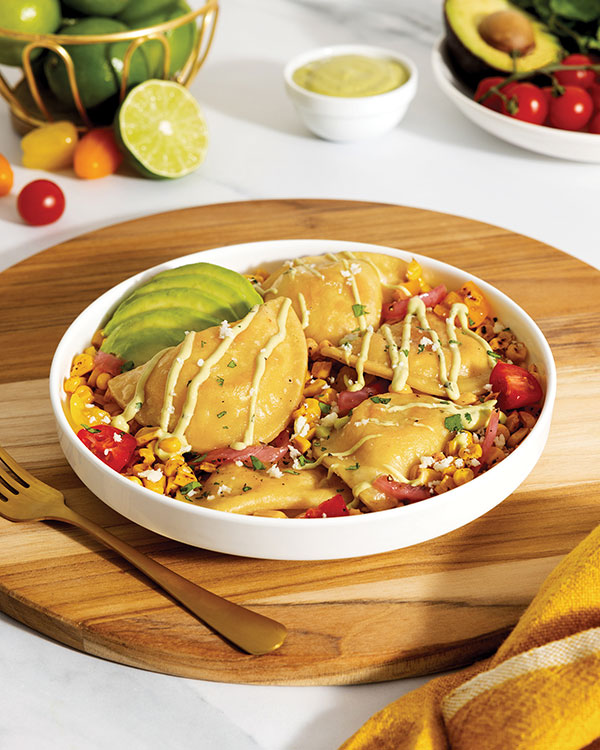
You can find a little inspiration in recipes like these Pierogy Burrito Bowls, loaded with cheesy pierogies, cherry tomatoes, corn, sliced avocado and homemade avocado mayo crema for a simple meal everyone in the family can enjoy.
No matter how parents switch up their weeknight routines, like a trip to the park or an at-home movie night, pierogies make weeknight recipes like this one possible because they’re simple and easy to prepare, leaving more time for parents to do the stuff they love with the ones they love.
To make burrito bowls: In medium skillet over medium heat, add avocado oil. Saute pierogies in batches, approximately 8 minutes on both sides, until golden brown. Remove from heat and set aside.
Divide pierogies, cherry tomatoes, corn, avocado, pickled red onions and Cotija cheese evenly among serving bowls. Garnish with cilantro.
To make avocado mayo crema: In food processor, process mayo, avocado and lime juice until smooth.
Drizzle avocado mayo crema over bowls, as desired.
Today the koji mold is a master fermenter, but it has a checkered past
By Rachel Ehrenberg
Nearly 9,000 years ago, around the time that humans were first domesticating corn and pigs, some people in China were taming fungi.
One such fungus, the mold Aspergillus oryzae, would go on to become a culinary superstar. Through fermentation of raw ingredients like soybeans or rice, A. oryzae helps to bring us soy sauce, sake and several other traditional Asian foods. It does so by breaking down proteins and starches so that other microbes can finish off the fermentations.
But A. oryzae wasn’t always so obliging. The wild version of the mold makes potent toxins that can poison the consumer and lead to cancer in the liver and other organs. Plus, it’s a destructive agricultural pest that causes millions of dollars in damage each year to crops like peanuts and corn.
What changed? Research is steadily revealing how the fungus transformed from a dangerous, toxic mold into a superior tool of food biotechnology that thrives in human-made environments. And as scientists study A. oryzae, they’re learning more about the process of domestication in microbes in general — which still remains in many ways mysterious.
“Almost everything we know comes from plants and animals,” microbial genomicist John Gibbons of UMass Amherst says of domestication. “You can see the difference between dogs and wolves, between corn and teosinte, but you can’t really see the differences between microbes … because most of it is changes in metabolism.”
A master digester
A. oryzae belongs to a family of fungi in a larger group known as the blue and green molds. Some 40 percent of the family’s species are in the genus Aspergillus, so named because the slender stalks and poofy tips of its spore-producing structures resemble an aspergillum, the holy water sprinkler used in some Christian denominations. The genus has several high-profile members, including helpful industrial species that crank out useful chemicals such as medicines or ferment foods, as A. oryzae does.
Known as the koji mold, A. oryzae is a master digester. In the first stage of soy sauce production, A. oryzae tackles the starter ingredients, typically soybeans and wheat; in sake production, it goes to work on rice. The mold’s digestive enzymes — proteases and amylases — break down the proteins and starches into simpler molecules that will be fermented by yeasts later on. The mold “smells like this wonderful mix of mushroom and grapefruit, and a little bit sour as well,” says microbiologist Benjamin Wolfe of Tufts University near Boston.
Other Aspergillus species are menaces — among them, Aspergillus flavus, the Mr. Hyde to A. oryzae’s Dr. Jekyll. A. flavus makes potent poisons called aflatoxins that, when ingested, are metabolized by the liver into compounds that damage DNA and otherwise mess with cellular functioning. It infects a variety of crops — corn, wheat, cassava, chili pepper, peanut, rice, sesame, sunflower seed and more. It can contaminate plants both before harvest and after, when crops are stored or shipped. The toxins can even contaminate the milk of animals that eat tainted feed. Despite various control measures, sporadic aflatoxin outbreaks poison and kill people and pets around the globe.
Scientists have long recognized that the hazardous A. flavus and the food fermenterA. oryzae are very close relatives — the two can appear identical in color and texture, or look very different from each other, making it tricky to tell them apart. Early investigations of their DNA reported remarkable similarity, and a 1998 study of a handful of genes from each fungus concluded that A.oryzaeevolved via domestication from A. flavus.
But A. oryzae doesn’t make aflatoxin and has been safely used as a food fermenter for thousands of years. Now scientists have begun to pinpoint the specific tweaks that that led to the major overhaul of the mold’s metabolism.
Soy sauce production involves two ferments; the koji mold is the workhorse of the first one.
CREDIT: BUSINESS INSIDER
A pivotal genetic deletion
Scientists had long been keen to establish genetic proof that A. oryzae couldn’t make aflatoxin, partly for reassurance that the mold is, and would remain, safe for fermenting food. Over the years, they have documented numerous large- and small-scale destructive changes in the cluster of more than two dozen genes that the fungus’s ancestor employed to make the toxin.
In one recent study, for example, scientists compared the genome of A. oryzae 14160, an industrial strain from China, with the genome of A. oryzae RIB40, a strain that was sequenced in 2005. In a report published in Frontiers in Microbiology in 2021, the team found that more than half of the aflatoxin gene cluster was deleted in strain 14160, while strain RIB40 has mutations in key genes here and there.
But from strain to strain to strain, there’s one deletion in the aflatoxin gene cluster that consistently appears, says Gibbons, who led the 2021 analysis with then-graduate student Katherine Chacón-Vargas (the group has been analyzing hundreds of strains of the molds). This finding suggests that at some point, a strain of wild A. flavus mold acquired the deletion, which rendered it harmless. After that, other genetic changes — mutations, deletions, other alterations — freely accumulated in the aflatoxin genes since they were no longer being used.
Domestication would have ensured that the harmless trait remained, says Gibbons. That’s because aflatoxin is a defensive compound the mold uses to kill other microbes. Since other microbes — specifically, yeasts — are part of the fermentation process for making soy sauce or the rice wine sake, the only fermentations that would work would be those in which Aspergillus toxins weren’t present to kill off the yeasts.
And in the cushy domesticated environment, the toxins aren’t important anyway. “You have this really stable food source all the time and there’s no longer a reason to produce defense chemicals because there’s enough food for everybody,” Gibbons says.
The loss of the ability to make aflatoxin probably paved the way for the fungus to ramp up its starch-digesting abilities, Gibbons adds. That’s because defense chemicals are expensive to make. “If they lose the ability to produce those toxins, it actually saves them a lot of energy that they can put into primary metabolism, like digesting starches and sugars and proteins,” he says.
Research suggests that this dialed-up ability to digest starch evolved over and over again. Back in 1989, for example, long before genome sequences were available for any Aspergillus species, several groups of scientists used methods to show that A. oryzae had multiple copies of the gene coding for alpha-amylase, the starch-digesting enzyme; two strains of the fungus had two copies while two other strains had three.
Researchers have since looked more closely and at more strains and found all sorts of variations on this theme. Strain RIB40, for example, has alpha-amylase genes on chromosomes 2, 3 and 5, while Gibbon’s team recently reported that the industrial strain from China, 14160, has two copies on chromosome 2 and a third copy on chromosome 6.
These kinds of changes also probably happened many times in the wild, says Gibbons, though before domestication, they weren’t retained because they weren’t of use. “But in the food environment, the more of these alpha-amylase genes you have, the more of this enzyme you’re producing,” he says. We humans would then have selected the starch-digesting powerhouse microbes in our domestication for fermentations.
Domestication of A. oryzae could have happened very quickly if research on Penicillium species, another famous mold in the Aspergillus family, is anything to go by.
P. camemberti, which is responsible for the white rind and distinctive smell of Camembert and Brie cheeses, is thought to have evolved from P. commune, a darkly pigmented, toxin-producing species with a musty odor. When Wolfe’s group at Tufts took a wild P. commune strain and another non-cheese Penicillium strain and serially grew them on cheese, after only eight generations — a period of a few weeks — the wild strains showed signs of domestication. Reporting in the journal mBio in 2019, the team found that the molds’ ability to make pigment and toxins diminished. At the same time, they lost their musty odor, acquiring the buttery, cheesy aromas characteristic of their domesticated relatives.
The human factor in fermentation
When contemplating the steps in the taming of A. oryzae, it’s useful to remember that fermentation and human evolution have probably always been intertwined, says microbial geneticist Kevin Verstrepen of VIB and Leuven University in Belgium.
For example, it’s easy to imagine early hominids eating fruit that had been visited by yeast and fermented into an alcoholic mash, and for humans to have recognized the merits of such fruit, both for its mind-altering effects and disinfectant qualities. “I wouldn’t be surprised if those things were discovered quite quickly,” says Verstrepen.
In the case of Aspergillus, spores are constantly drifting about — we inhale upwards of 200 per day, researchers estimate — and they will grow if they settle in a warm, humid spot. A recent reconstruction of the Aspergillus family tree by evolutionary biologist Antonis Rokas of Vanderbilt University suggests that A. flavus and some version of its domesticated counterpart, A. oryzae, last shared an ancestor roughly 3.8 million years ago. A. oryzae is naturally fond of rice, and versions of A. flavus that didn’t make aflatoxin were likely present on wild rice plants consumed by early humans.
With the advent of farming in the Neolithic some 12,000 or so years ago, domestication became a full court press. As people settled in communities and began regularly planting crops and keeping animals, there would have been an excess, perhaps for the first time, of grain or milk or meat. Fermentation provided a way to keep food past harvest and prolong shelf life.
“One of the best examples is raw milk — it goes bad in a day or so at room temperature,” says Gibbons. “But if you ferment it into a hard cheese, you can travel around with it in your pocket at room temperature for a month.”
An early example of people intentionally fermenting foods — very likely using Aspergillus — comes from the Neolithic village Jiahu in Henan province in China, a site with artifacts suggesting domesticated rice and early musical instruments. In 2004, a team reported that pottery shards from the site contained residues of a fermented drink of rice, honey and fruit — basically, a rice wine or “proto-sake,” says Gibbons. Scientists have since investigated residues in vessels from two other early Neolithic sites in China and found traces of fungi, including some that are startlingly like our hero, the koji mold.
Initially, people probably relied on spontaneous colonization by A. oryzae and other microbes but at some point, “back-slopping” developed, wherein a portion of a previous ferment is used to start a new one, like a sourdough starter is used for bread. This intentional fermentation with A. oryzae appears to have been happening as early as 2,300 years ago: The mold gets a mention in the ancient Chinese text Zhouli (Rites of the Zhou dynasty) that dates to 300 BCE. Some time later, people began breeding A. oryzae on steamed rice; its spores were then separated from the grain with a silk sieve and dried for use as needed.
Verstrepen is fond of telling his students that beer yeasts, living year-round in their vats where they are warm and well-fed, are like dogs, while wine yeasts, which are harnessed during the harvest but may intermingle with wild species in the intervening months, are like cats.
Today, says Rokas, A. oryzae is like a dog. There are numerous bred strains that people can order depending on their specific fermenting needs. But for a long time, there would have been unfettered variety floating around — lots of A. oryzae/A.flavus strains with defunct toxin genes and differing abilities to digest starch, and a matter of fortune which ended up in your soy sauce or sake brew. The mold of the ancients, Rokas says, “must have been more catlike.”
Warmer temperatures and sun-filled days mean it’s time to take entertaining and socializing outdoors, and a key component of many outdoor gatherings is fresh-grilled food.
Because firing up the grill can make prepping meals quick and easy, it allows you to spend more time with friends and family rather than missing out on the sunshine while stuck in the kitchen. Whether you’re a first-time griller or consider yourself a master of the grates, there’s a grill available to meet your skill level and needs, such as these options that provide flexibility for small-to-midsize backyard spaces – as well as a large built-in model for custom outdoor kitchens – and a variety of features and function to make the most of your warm weather gatherings.
Portable, Small-Space Cooking
Ideal for first-time grillers, couples, small families or those with limited backyard spaces, the Megamaster 3-Burner Gas Grillwas designed to fuse performance and value. Despite its size, it can cater to almost any grilling or entertaining need with three stainless steel burners and 447 square inches of cooking space, a combination of versatility and capacity to prepare large quantities of food as well as various types of food simultaneously. Plus, it’s easy to maneuver on two heavy-duty wheels, making it simple to free up patio space after use. Learn more at megamaster.com.
Family-Sized Functionality
With ample cooking space to feed small and medium-sized groups, the Nexgrill 4-Burner Gas Grill with Side Burner is a perfect all-around grill for both beginners and seasoned grilling enthusiasts. Always ready to fire up some flavor, the durable grill also features a stainless steel side burner to saute, simmer and warm dishes simultaneously as well as 628 square inches of cooking space, meaning family favorites like burgers, dogs, chicken and more can be put on the table quickly. Find more information at nexgrill.com.
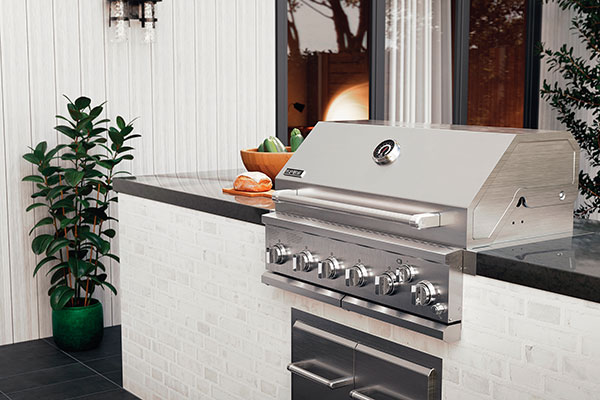
Elevate Your Outdoor Kitchen
If your outdoor living area includes enough space, you can elevate the outdoor cooking experience with an outdoor kitchen. Put a premium, built-in grill like the Spire 6-Burner Built-In Grill at the center of your custom, luxurious entertaining space. This dual-fuel, stainless steel gas grill features 904 square inches of cooking space and 73,000 British thermal units of cooking power across six main burners and an intense-heat ceramic rear burner, producing restaurant-quality sear marks and exceptional heat retention. Visit spireoutdoor.com to learn more about the durable, high-performance grilling solution.
Letting in a little fresh air with an open window or a screen door is a sure sign of spring, allowing the natural sights and smells of the outdoors to accompany you at the dinner table. Take that open-air freshness to new heights this spring by pairing it with your own signature spins on salad season.
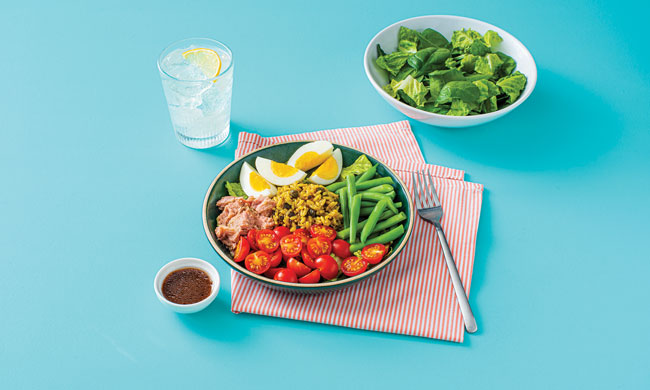
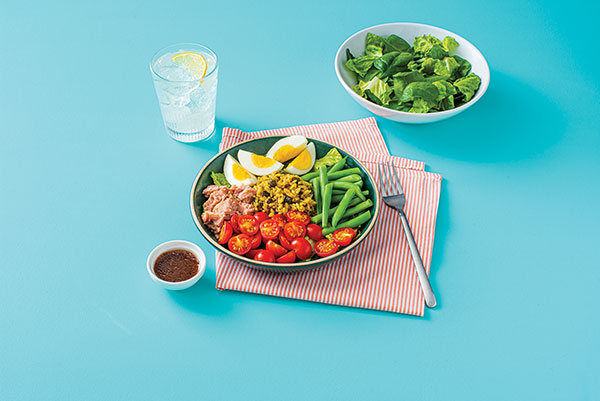
For example, this Tuna and Rice Nicoise Salad offers a new take on tuna salad with olive tapenade, capers, tomatoes, green beans and cherry tomatoes. Its calling card: swapping out potatoes in favor of Minute Yellow Rice Cups, which cook up fast as a convenient and flavorful alternative that saves the chore of washing, peeling and boiling potatoes. Fully cooked and packaged in BPA-free cups, it features white rice lightly seasoned with onion powder, garlic powder and turmeric for a delightful taste ready in just 1 minute.
As a perfect recipe for those who love veggies, this dish combines classic salad freshness with olive tapenade for a briny bite in every mouthful. Canned tuna mixes with bursts of capers, hard-boiled egg, crisp green beans and sweet cherry tomatoes capped off with tart balsamic dressing to round out the dish.
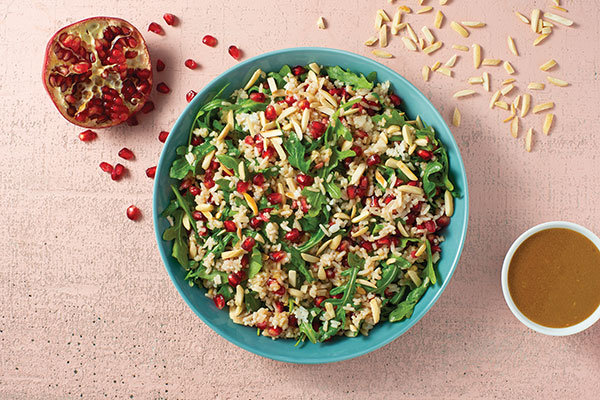
If you love the taste of crisp, peppery arugula, this Pomegranate and Arugula Rice Salad is practically perfect. Your favorite green shines alongside a delicious mix of sweet pomegranate seeds, crisp almonds and tart balsamic dressing that’s ideal for a starter or side, or you can add a preferred protein to turn it into a satisfying main course.
Incredibly colorful with a lively taste, bright flavors mingle with fluffy grains of Minute Instant Jasmine Rice, ready in just 5 minutes to keep your dinner schedule on track. Aromatic white rice provides a distinct scent, perfect texture and delicious taste that’s fast, fragrant, flavorful and fluffy. It’s simply precooked then dried with nothing added but convenience to help you get tasty meals on the table quickly.
Requiring just 15 minutes to prepare, this salad is ready in an instant and serves up to eight people, making it a solution for anything from family gatherings to meal prepping for a busy week ahead.
Find more spring salads and other flavorful, convenient recipes by visiting MinuteRice.com.
Kid-friendly crafts that bring loved ones together
Holiday hams and deviled eggs may take center stage at Easter gatherings, but edible crafts offer a reminder of the magic of the season that’s found in moments spent together. Simple recipes that call for a dose of creativity are perfect ways to bring the kids to the kitchen, made even easier when all that work leads to sweet treats.
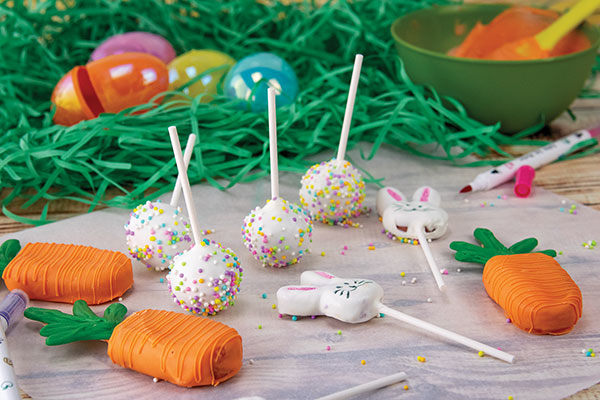
While plastic eggs may have led to a decline in good, old-fashioned egg-dyeing, there are still fun ways to bring crafts back to Easter celebrations. Consider these Kids Krafty Easter Cake Pops, which call for little ones to help dip seasonal shapes in chocolate, use cake molds and more.
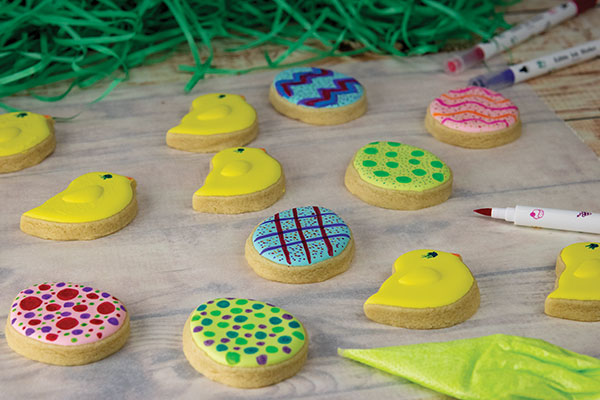
Children of virtually any age can relish in the joys of using cookie cutters and decorating Easter Sugar Cookies, all with a little supervision and short list of instructions. This version shows how to make the cookies and homemade icing so you can create any color you desire for maximum creativity.
Remember, these delicious crafts don’t have to be perfect – having fun and making memories that last a lifetime are what make Easter truly special.
Visit Culinary.net to find more Easter inspiration and recipes from “Cookin’ Savvy.”
Bake cake according to package instructions and let cool completely.
Crumble cake and mix with 1/2 can frosting until dough forms. Add more frosting, if needed. Using small cookie scoop, form dough into balls and set aside. Place dough in bunny molds then pop out and set aside with balls. Place dough in cakesicle mold, insert ice pop stick in each slot and freeze 5-10 minutes.
Melt handful of white melting chips. Stick tip of each cake pop stick in chocolate then insert into every cake ball and bunny until each has one stick. Set aside to dry.
Remove cakesicles from freezer and pop out of molds. In bowl, melt orange melts then mix in 1 tablespoon oil and transfer to cup. Dip cakesicles and scrape off excess using rim of cup. Place on parchment paper to dry.
In bowl, melt green melts then place in zip-top or piping bag. Cut tip off bag, pipe carrot leaves onto piece of parchment paper and let dry.
Melt remaining white melts and mix in remaining oil. Transfer to cup and dip ball-shaped cake pops and bunnies then tap stick on edge of cup to remove excess.
Over separate bowl, sprinkle ball-shaped pops with pastel sprinkles. To keep ball shape, let dry by sticking in piece of hard foam. Bunnies can dry face side up on parchment paper. After bunnies are dry, use edible markers to make face and color in ears.
When carrots and leaves are dry, remelt orange melts and place in piping or zip-top bag. Cut off tip and drizzle orange over carrots. Add small line of orange on each ice pop stick and place leaves on each stick. Let dry.
Easter Sugar Cookies
Recipe courtesy of "Cookin' Savvy"
Icing:
1/3 cup meringue powder
1/2 cup warm water, plus additional for thinning (optional), divided
3 tablespoons vanilla
1 bag (2 pounds) powdered sugar
2 tablespoons corn syrup
assorted food coloring
Cookies:
2 sticks unsalted butter, at room temperature
1 cup sugar
1 egg
1 tablespoon vanilla
2 teaspoons baking powder
1 dash salt
3 cups all-purpose flour
To make icing: Mix meringue powder, 1/2 cup warm water, vanilla, powdered sugar and corn syrup. Separate into bowls and add food coloring; mix with water, as needed, to thin for piping.
To make cookies: Heat oven to 350 F.
Cream butter and sugar. Mix in egg, vanilla, baking powder and salt. Mix in flour 1 cup at a time to form dough. Roll dough out to 1/4-1/2-inch thickness.
Cut into shapes, place on baking sheet and freeze 10 minutes. Bake 8-12 minutes. Cool completely before icing.
Place icing in zip-top or piping bags and cut off tips. Put cookies on parchment paper. Trace outline first then fill in middle. Use toothpicks to smooth out.
Let dry 6 hours and finish decorating with different icing colors or edible markers.
Few things go together quite like fresh spring air, warm sunshine and a menu made up of delicious brunch bites. Whether you’re hosting a crowd or simply gathering your loved ones around the family table for quality time together, a menu of morning favorites can appease appetites of all kinds.
From sweet to savory and back again, you can turn your mid-morning meal into a full-blown feast with a menu made up of pleasing dishes such as this French Toast Casserole, which can serve as a make-ahead twist on the breakfast classic; customizable Breakfast Burritos that pack a protein punch; and a bite-sized treat like Double Chocolate Chip Mini Muffins for a sweet finishing touch to any brunch occasion.
Find more recipes to inspire your next brunch menu at Culinary.net.
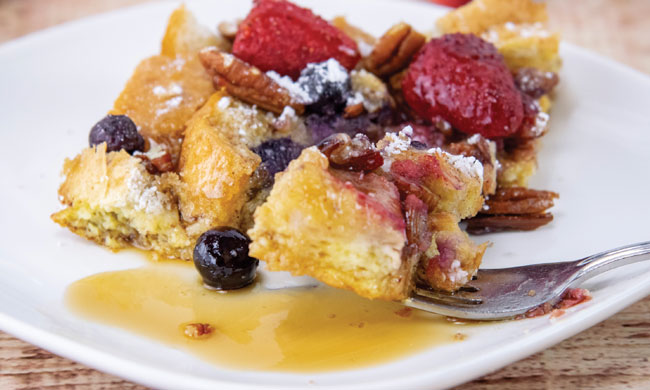
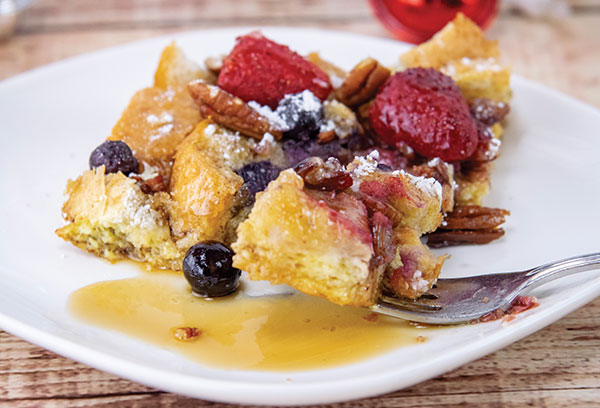
Warm Up with a Fresh Casserole
An exciting twist on a breakfast classic, it’s hard to beat this French Toast Casserole when putting together your brunch spread. Crisp on top while soft and moist in the middle, it comes fresh out of the oven with the aroma of maple syrup and pecans that will have the whole house eager for a bite. It’s easy enough to make fresh in the morning but can also be prepared the night before so all you have to do is add the topping and pop it in the oven.
French Toast Casserole
1 loaf French bread (about 1 1/2 pounds), cut into 1-inch cubes
5 large eggs
1 1/2 cups unsweetened milk
2 tablespoons brown sugar
2 teaspoons vanilla extract
1 teaspoon cinnamon
1/4 teaspoon nutmeg
1/4 teaspoon sea salt
maple syrup, for serving
Topping:
2 tablespoons unsalted butter or coconut oil, melted
2 tablespoons brown sugar
1/2 cup chopped pecans
1 cup frozen strawberries
1 cup frozen blueberries
confectioners' sugar, for dusting
Grease 9-by-13-inch baking dish. Place bread cubes in baking dish. In large bowl, whisk eggs, milk, brown sugar, vanilla, cinnamon, nutmeg and salt. Pour mixture evenly over bread cubes.
If making casserole ahead, cover baking dish and refrigerate overnight. If baking immediately, let stand 30 minutes at room temperature to allow bread to soak up egg mixture.
Preheat oven to 350 F.
To make topping: Drizzle casserole with melted butter and sprinkle with brown sugar and pecans. Top with strawberries and blueberries.
Cover and bake 35 minutes then uncover and bake 10-20 minutes, or until topping is browned and egg mixture has mostly set.
Remove from oven, cover loosely with foil and let stand 10 minutes. Dust with confectioners' sugar. Serve with maple syrup.
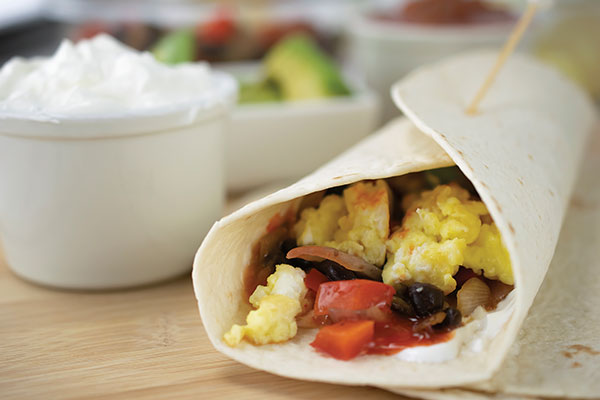
Brunch with a Powerful Punch
When you’re craving something hearty and rich, switch up your brunch habits with wholesome and filling Breakfast Burritos. With protein to keep you full, veggies for a touch of added nutrition and hot sauce to pack a powerful punch of flavor in every bite, this hearty recipe will keep you full and bursting with energy until your next meal. Plus, they’re easy to make in a matter of minutes and totally customizable to accommodate every palate.
Breakfast Burritos
Servings: 4
2 teaspoons canola oil
1 small red onion, diced
1 red bell pepper, seeded and diced
1 can black beans, drained and rinsed
1/4 teaspoon red pepper flakes
salt, to taste
pepper, to taste
4 eggs
4 egg whites
1/2 cup shredded pepper jack cheese
nonstick cooking spray
4 flour tortillas
1/4 cup sour cream
1/4 cup salsa
1 large tomato, seeded and diced
1 avocado, sliced
hot sauce (optional)
In large skillet, heat canola oil over medium heat. Add red onion and red bell pepper; cook 8 minutes. Add black beans and red pepper flakes; cook 3 minutes. Season with salt and pepper, to taste. Transfer to dish.
In medium bowl, whisk eggs and egg whites. Stir in cheese until combined. Heat large skillet over low heat, add egg mixture and scramble 3 minutes, or until cooked through.
Spread sour cream over tortilla. Spread salsa over sour cream. Spoon 1/4 bean mixture over salsa. Spoon 1/4 scrambled eggs over bean mixture. Top with diced tomatoes and avocado. Drizzle with hot sauce, if desired. Roll-up burrito. Repeat three times with remaining ingredients and serve.
Bite-Sized Chocolate Delights
Flavorful French toast, filling breakfast burritos and favorite fruits make a feast to look forward to, but no brunch spread is complete without a chocolatey bite to cap off the meal. In fact, make it a double.
These Double Chocolate Chip Mini Muffins offer a combination of two kinds of rich chocolate complemented by the caramel notes of C&H Light Brown Sugar for an irresistible dessert in bite-sized form. Tiny, tasty treats are a perfect way to send guests off with one sweet final bite.
Visit chsugar.com to find more delectable dessert recipes.
Preheat oven to 350 F. Line mini muffin pan with mini cupcake liners.
In large mixing bowl, use whisk to combine flour, cocoa powder, baking soda and salt. Add chocolate chips and stir to ensure chocolate chips are coated in flour mixture.
In separate large mixing bowl, use wire whisk to whisk eggs and sugars until ingredients are combined and sugars are dissolved. Add sour cream, oil and milk. Whisk again to combine. If using espresso powder, add to vanilla then add to wet ingredients. Whisk vanilla espresso mixture into other liquid ingredients.
Pour liquid ingredients on top of dry ingredients. Using rubber spatula, mix until just combined, being careful to not overmix. Batter should be thick and shiny.
Using tablespoon or two spoons, spoon muffin batter into liners. Batter should be filled almost to top of each liner. Top each muffin with flaked sea salt before baking, if desired.
Bake muffins on center rack 6 minutes. Rotate pan and bake 6 minutes, or until toothpick inserted in muffin comes out clean. Once muffins finish baking, place muffin pan on cooling rack to cool completely.
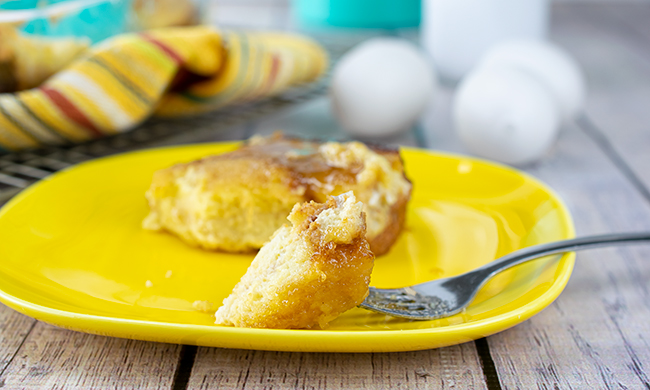
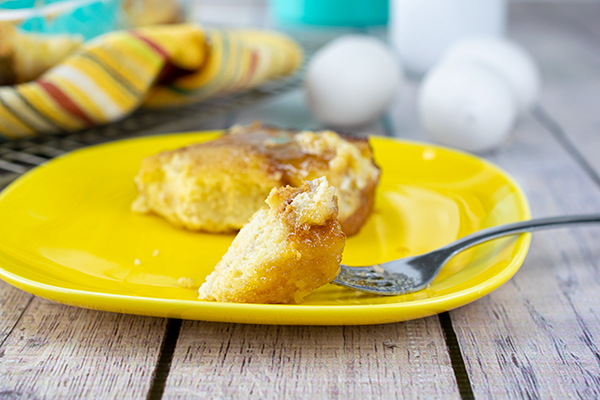
Cooking for a small crowd can be daunting. With this recipe for Caramel French Toast, you can prepare it the night before, bake in the morning and satisfy your guests without going overboard in the kitchen.
Find more breakfast and brunch recipes at Culinary.net.
Watch video to see how to make this recipe!
Caramel French Toast
6 slices white bread, halved
1/4 cup butter, cubed
1/2 cup brown sugar
1 tablespoon corn syrup
3 eggs
3/4 cup half-and-half
1/2 teaspoon vanilla extract
1/2 teaspoon cinnamon
1/4 teaspoon salt
powdered sugar (optional)
Cut bread slices in half.
In saucepan, melt butter. Add brown sugar and corn syrup. Bring to boil, stirring frequently.
Pour into 8-inch square baking dish. Arrange bread slices over caramel mixture.
In small bowl, whisk eggs, half-and-half, vanilla extract, cinnamon and salt. Pour over bread slices. Cover with aluminum foil and refrigerate overnight.
Heat oven to 350 F.
Remove from refrigerator 30 minutes before baking and remove aluminum foil.
Bake 25-35 minutes, or until toothpick inserted into center comes out clean.